Introduction
在 14 年 iOS 8 发布之后就想着统一一下 AlertView 和 iOS 8 开始使用的 AletViewController,最近终于把这事给办了;虽然最近也很忙,但还是准备了不少东西,除了这个通用封装之外,紧接着将还有一篇,先剧透下—是有关通过浏览器线上调试的…
封装思路
iOS 8 有了很大的变化,每个按钮对应了一个 UIAlertAction 对像,相关的索引和标题都在这里存放;block 回掉点击事件;因此,想办法处理一下 iOS 7 的AlertView,使之支持添加 Action,block 回掉点击事件;然后搞个manager,来管理 iOS 8 前后调用的类,从而达到通用的效果! ActionSheet 也是同样的道理,我觉得分开处理比较好,因此最终我讲封装出来两个控制器出来。
iOS 7并没有 Action 类,因此自己写个命名为 QLBlockAlertAction ; 并且定义相关的枚举值,这个很好做,直接 copy iOS 8 系统定义的改个名字就行了;
实现代码
按照上面描述的思路开始 code:
处理 iOS 7 的 AlertView
1
2
3
4
5
6
7
8
9
@interface QLBlockAlertAction : NSObject

+ (instancetype)actionWithTitle:(NSString *)title style:(QLAlertActionStyle)style handler:(void (^)(QLBlockAlertAction *action))handler;

@property (nonatomic, copy, readonly) NSString *title;
@property (nonatomic, assign,readonly) QLAlertActionStyle style;
@property (nonatomic, copy, readonly) void (^AlertHandler)(QLBlockAlertAction *);

@end
这个是支持AlertView block 回调的;
1
2
3
4
5
6
7
8
9
@interface QLBlockAlertView : UIAlertView

+ (instancetype)alertWithTitle:(NSString *)title message:(NSString *)message;

- (void)addActionWithTitle:(NSString *)title style:(QLAlertActionStyle)style handler:(void (^)(QLBlockAlertAction *action))handler;

@property (nonatomic, strong, readonly) NSArray *actions;

@end
集成系统类,封装得跟 iOS 8一样,这样减轻了manager的麻烦,就能统一处理了,支持添加 action;
1
2
3
4
5
6
typedef NS_ENUM(NSInteger, QLAlertActionStyle) {
    QLAlertActionStyleDefault = 0,
    QLAlertActionStyleCancel,
    QLAlertActionStyleDestructive //actionsheet使用
};
这个很简单,copy iOS 8 的就行了;主要是区分 actionstyle 和 alert 和 actionsheet 的;iOS 8 alert 和 actionsheet 是一个控制器;这个抽取一个Header 叫:QLAlertSheetCommonHeader ;
到此为止 iOS 8之前的 alertview 已经改造完毕了;现在就可以是使用了;同样的方式去改造 actionsheet;
1
2
3
4
5
6
7
8
9
10
@interface QLBlockActionSheet : UIActionSheet

- (instancetype)initWithTitle:(NSString *)title;

- (void)addActionWithTitle:(NSString *)title style:(QLAlertActionStyle)style handler:(void (^)(QLBlockAlertAction *action))handler;

@property (nonatomic, strong, readonly) NSArray *actions;

@end
接下来改写我们的统一的管理者了,这里分开写,一个是管理 AlertView 的,一个是管理 ActionSheet 的;这里简单看下 AlertView 的通用管理者: QLAlertViewController ;
1
2
3
4
5
6
7
8
9
10
11
@interface QLAlertViewController : NSObject

+ (instancetype)alertWithTitle:(NSString *)title message:(NSString *)message;

- (void)addActionWithTitle:(NSString *)title style:(QLAlertActionStyle)style handler:(void (^)(QLBlockAlertAction *action))handler;

- (NSArray *)actions;

- (void)showInViewController:(UIViewController *)vc;

@end
看着跟 iOS 8的没什么两样,所以就没写注释;看下内部实现吧:
1
2
3
4
5
6
7
8
9
10
11
12
13
14
15
16
17
18
19
20
21
22
@interface QLAlertViewController ()

@property (nonatomic, strong) QLBlockAlertView *alertView;
@property (nonatomic, strong) UIAlertController *alertController;

@end

@implementation QLAlertViewController

- (instancetype)initWithTitle:(NSString *)title message:(NSString *)message
{
    self = [super init];
    if (self) {
        if (_IS_IOS8_LATER_) {
            self.alertController = [UIAlertController alertControllerWithTitle:title message:message preferredStyle:UIAlertControllerStyleAlert];
        }else{
            self.alertView = [QLBlockAlertView alertWithTitle:title message:message];
        }
    }
    return self;
}
说白了就是根据系统版本进行区分,iOS 8 以后就用系统的 UIAlertController 处理;反之就使用我们封装的 QLBlockAlertView ;因为我们是按照 iOS 8 的形式封装的,所以内部处理也很简单:
1
2
3
4
5
6
7
8
9
10
11
12
13
14
15
16
17
18
19
- (void)addActionWithTitle:(NSString *)title style:(QLAlertActionStyle)style handler:(void (^)(QLBlockAlertAction *))handler
{
    if (_IS_IOS8_LATER_) {

        void (^actionHandler)(UIAlertAction * action) = NULL;

        if (handler) {
            actionHandler = ^(UIAlertAction * action){
                QLBlockAlertAction *ac = [QLBlockAlertAction actionWithTitle:title style:style handler:handler];
                handler(ac);
            };
        }
        UIAlertAction *action = [UIAlertAction actionWithTitle:title style:QLAlertActionStyle2UIAlertActionStyle(style) handler:actionHandler];
        [self.alertController addAction:action];
    }else{
        [self.alertView addActionWithTitle:title style:style handler:handler];
    }
}
展示 AlertView 的使用需要一个控制器:
1
2
3
4
5
6
7
8
9
10
11
12
13
- (void)showInViewController:(UIViewController *)vc
{
    if (_IS_IOS8_LATER_) {
        UIViewController *presentingViewController = vc;
        while (presentingViewController.presentedViewController) {
            presentingViewController = presentingViewController.presentedViewController;
        }
        [presentingViewController presentViewController:self.alertController animated:YES completion:nil];
    }else{
        [self.alertView performSelectorOnMainThread:@selector(show) withObject:nil waitUntilDone:YES];
    }
}
是不是很简单呢?有木有…
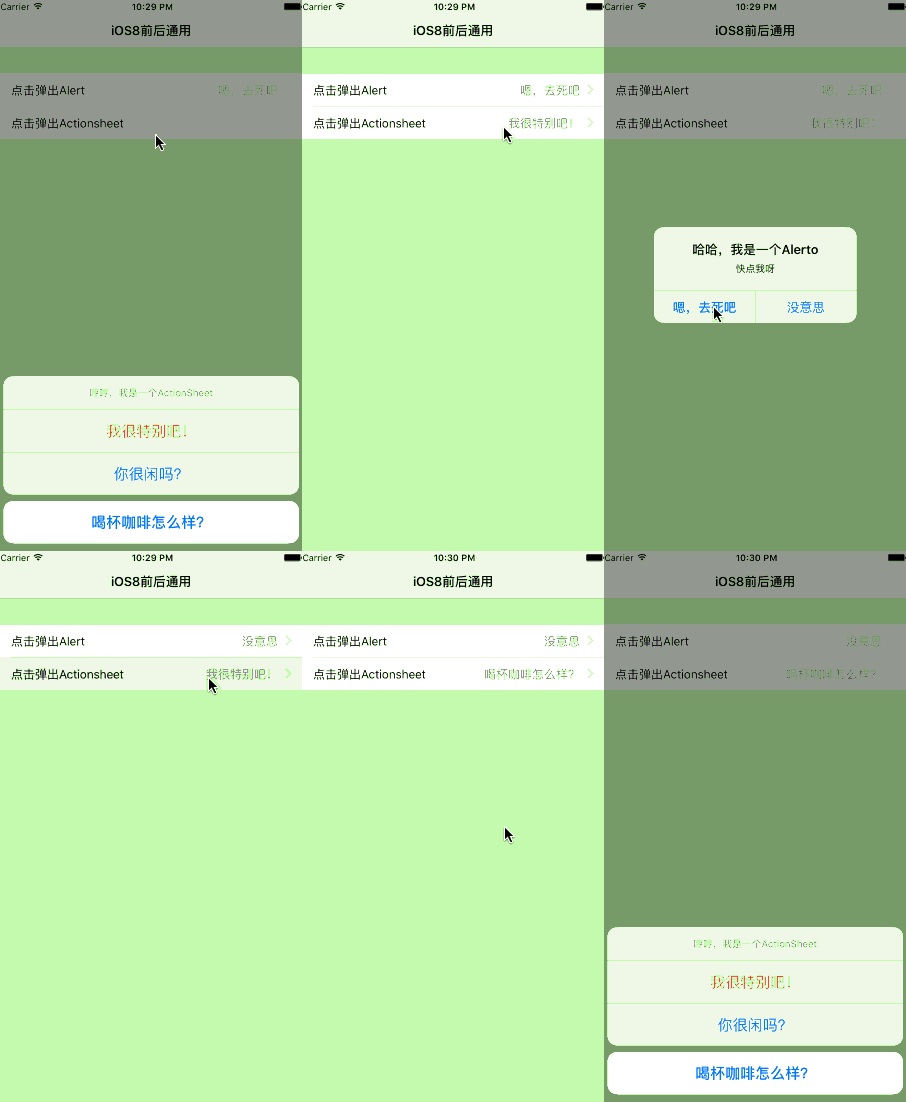
简单的使用
看下 ActionSheet 的使用吧,AlertView跟也是这个一样的:
1
2
3
4
5
6
7
8
9
10
11
12
13
14
15
16
17
18
19
20
//创建对象;
QLActionSheetController *actionsheet = [QLActionSheetController actionSheetWithTitle:@"哼哼,我是一个ActionSheet"];

        //添加处理action;
        [actionsheet addActionWithTitle:@"我很特别吧!" style:QLAlertActionStyleDestructive handler:^(QLBlockAlertAction *action) {
            [weakself updateForRow:indexPath.row text:action.title];
        }];


        //添加处理action;
        [actionsheet addActionWithTitle:@"你很闲吗?" style:QLAlertActionStyleDefault handler:^(QLBlockAlertAction *action) {
            [weakself updateForRow:indexPath.row text:action.title];
        }];

        //添加取消action;
        [actionsheet addActionWithTitle:@"喝杯咖啡怎么样?" style:QLAlertActionStyleCancel handler:^(QLBlockAlertAction *action) {
            [weakself updateForRow:indexPath.row text:action.title];
        }];
        //展示;
        [actionsheet showInViewController:self];
效果
